Creating a WhatsApp Template
Overview
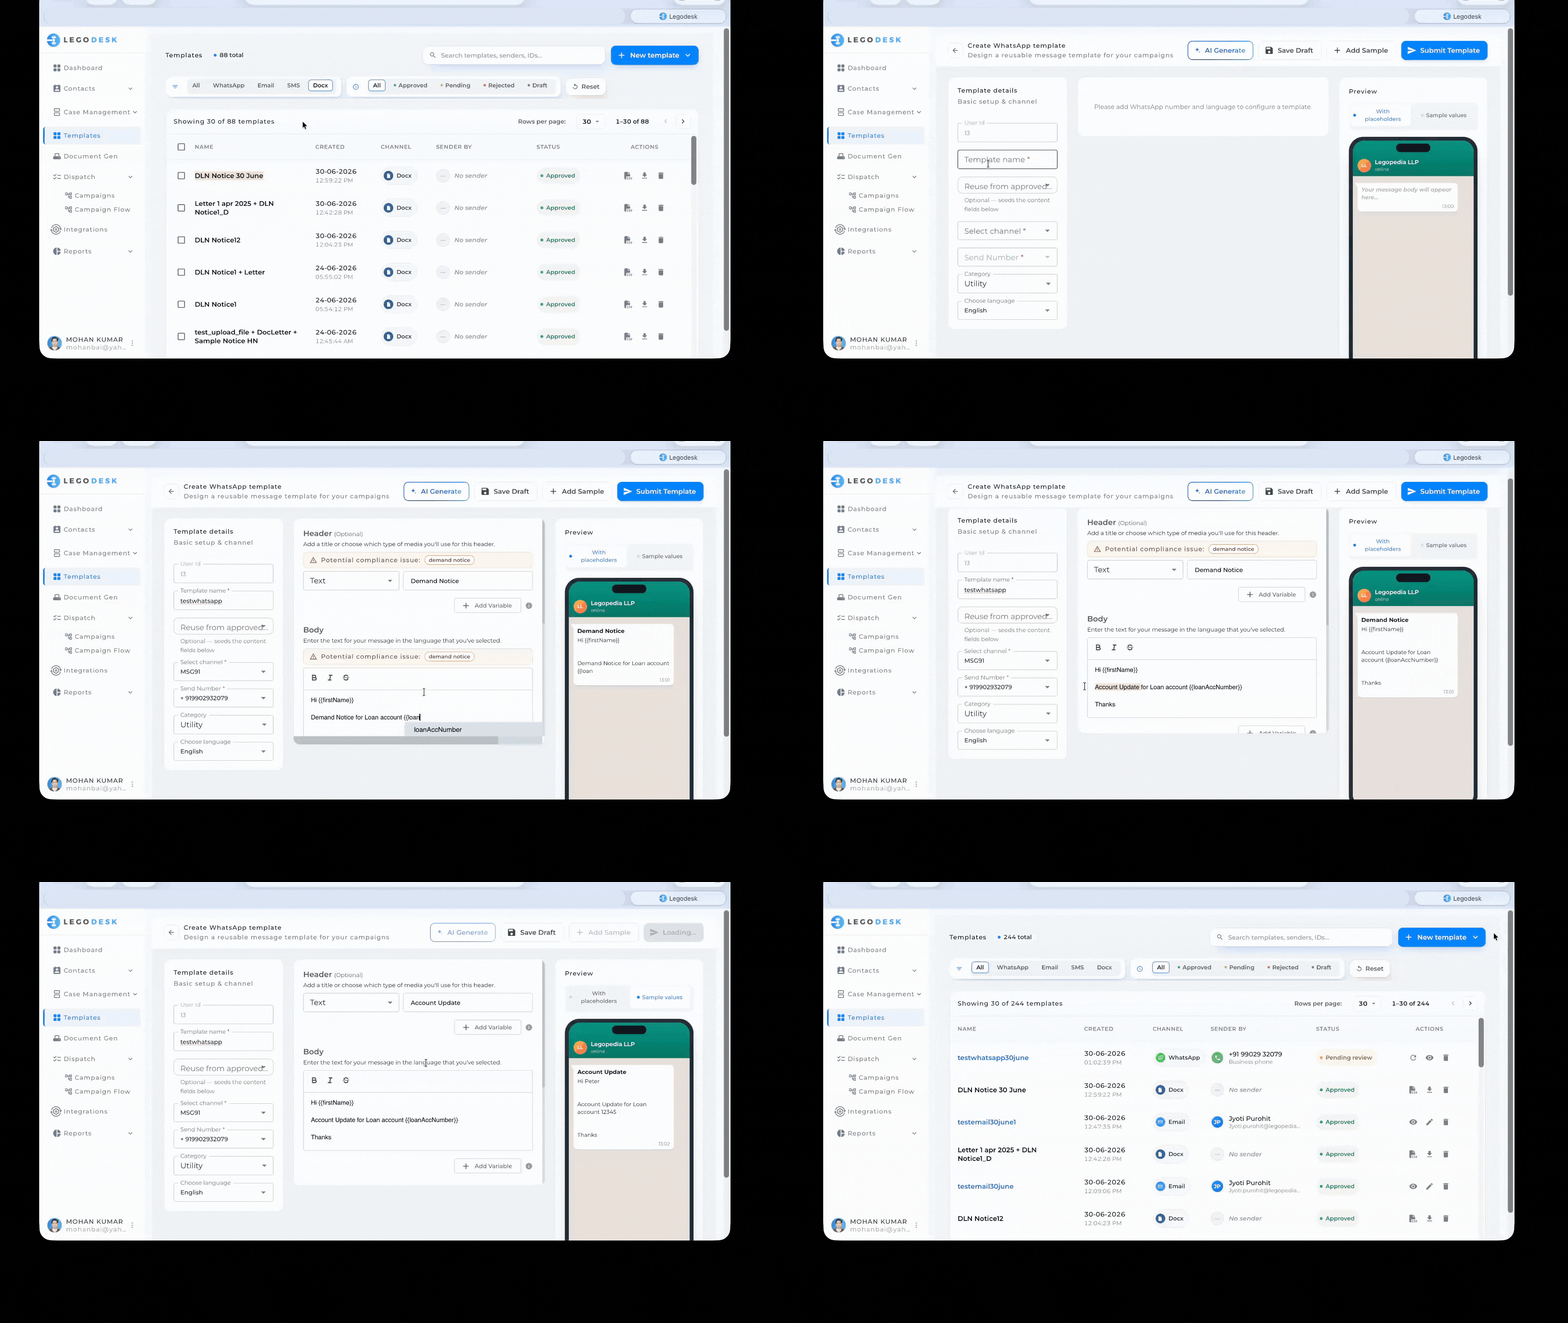
The Create WhatsApp Template page lets you design reusable message templates for your WhatsApp campaigns. Once submitted and approved by Meta (WhatsApp’s parent company), these templates can be used to send messages to your contacts at scale through Legodesk’s Dispatch feature.
- Wrong category selected for the message type
- Template contains prohibited content (e.g., misleading claims, restricted industries)
- Variables are used without providing sample values
- Template language doesn’t match the selected language setting
Getting to This Page
- In the left sidebar, click Templates.
- Click the + New Template button in the top-right.
- Select WhatsApp as the channel type
Page Layout
The page is divided into three panels:
Lorem ipsum dolor sit amet, consectetur adipiscing elit. Ut elit tellus, luctus nec ullamcorper mattis, pulvinar dapibus leo.
| Panel | Purpose |
|---|---|
| Template Details (left) | Basic setup — name, channel, sender number, category, and language |
| Message Builder (center) | Design the header, body, and footer of your message |
| Preview (right) | See a live phone preview of how the message will appear to recipients |
Panel 1: Template Details
This panel handles the basic configuration of your template.
User ID
A system-assigned identifier for your account. This is auto-filled and cannot be edited.
Template Name (required)
Give your template a unique, descriptive name (e.g., loan_update_june).
- Use only lowercase letters, numbers, and underscores — no spaces or special characters.
- The name must be unique within your account.
- This name is used internally in Legodesk and when submitting to Meta for approval.
Reuse from Approved
An optional shortcut — select an existing approved template to pre-fill the content fields below. This saves time when creating a variation of a template you’ve already built.
Select Channel (required)
Choose the WhatsApp sender channel/whatsapp service provider (e.g., MSG91). This determines which messaging provider is used to deliver the template.
Send Number (required)
Select the business phone number the message will be sent from (e.g., +91 99029 32079). Only numbers configured in whatsapp service providers dashboard appear here.
Category (required)
WhatsApp requires every template to be assigned a category. Choose the one that best describes your message:
| Category | Use Case |
|---|---|
| Utility | Transactional updates — account alerts, loan updates, order confirmations |
| Marketing | Promotional messages, offers, and campaigns |
Tip: Choosing the wrong category is a common reason for template rejection. Select the category that most closely matches your message’s purpose.
Choose Language (required)
Select the language your template is written in (e.g., English). WhatsApp requires templates to match the selected language. You can create separate templates for different languages.
Panel 2: Message Builder
This is where you write the actual content of your WhatsApp message. It has three sections: Header, Body, and Footer.
Header (Optional)
The header appears at the top of your message. Use the dropdown to select the type:
| Option | Description |
|---|---|
| None | No header — the message starts directly with the body text |
| Text | A short bold title line above the body |
To add a variable:
- Place your cursor in the body text where you want the variable to appear.
- Click + Add Variable or type double curly brackets {{
- Type or select the variable name.
Body (required)
The body is the main content of your message. Type your message text in the box provided.
Formatting options:
| Button | Effect |
|---|---|
| B | Bold text |
| I | Italic text |
| S | Strikethrough text |
Using Variables
Variables let you personalize messages for each recipient. They are written using double curly braces: {{variableName}}.
Example:
Hi {{firstName}},
Update regarding your Loan account {{loanAccNumber}}
When the message is sent, {{firstName}} and {{loanAccNumber}} are automatically replaced with each contact’s actual data.
To add a variable:
- Place your cursor in the body text where you want the variable to appear.
- Click + Add Variable or type double curly brackets {{
- Type or select the variable name.
Note: Variable names must match the data fields available in your contact records. Click the ℹ️ icon next to + Add Variable for guidance on supported variable names.
Footer (Optional)
The footer appears as a small line of text at the very bottom of the message — typically used for disclaimers, unsubscribe notices, or brand taglines.
Example: “Reply STOP to unsubscribe.”
Keep footer text short and concise.
Button (Optional)
- Scroll to the Buttons section (below Footer) on the Create WhatsApp Template page.
- Click + Add button.
- A dropdown appears with three button types — select the one that fits your use case.
- Quick Reply button lets the recipient send a pre-set text response back to you with a single tap. The reply appears in your inbox automatically.
- Call Phone Number – opens the recipient’s phone dialer with your business number pre-filled. The recipient taps the button and the call connects instantly.
- Visit Website button opens a URL in the recipient’s browser when tapped. You can use a static URL or a dynamic URL
Panel 3: Preview
The preview panel on the right shows a real-time phone mockup of how your message will look to the recipient in WhatsApp.
Preview Modes
| Mode | What it Shows |
|---|---|
| With markers | Shows variable placeholders as written (e.g., {{firstName}}) |
| Sample values | Replaces variables with example data so you can see a realistic message |
Use Sample values to check that the message reads naturally before submitting.
Top Action Buttons
| Button | Description |
|---|---|
| ✨ AI Generate | Automatically generate message body content using AI based on your template's purpose. Useful for drafting a starting point quickly |
| 💾 Save Draft | Save your progress without submitting. The template will appear in the Templates list with a Draftstatus. |
| + Add Sample | Add sample values for your variables. Meta requires sample values when submitting templates with variables, so reviewers can see how the message will look when sent. |
| ▶ Submit Template | Submit the template to Meta (WhatsApp) for review and approval. The template status will change to Pending until Meta responds. |
Submitting for Approval
WhatsApp templates must be approved by Meta before they can be used. Before submission, WhatsApp templates are automatically reviewed by AI against Meta’s compliance policies. Any non-compliant text in the template receives targeted improvement suggestions and must pass the check before they can be submitted.
- Click Submit Template once your template is complete.
- The template status changes to Pending.
- Meta typically reviews templates within 24–48 hours.
- Once approved, the status updates to Approved and the template becomes available for use in Dispatch.
- If rejected, the status changes to Rejected. Review the rejection reason, revise your template, and resubmit.
Common Reasons for Rejection
- Wrong category selected for the message type
- Template contains prohibited content (e.g., misleading claims, restricted industries)
- Variables are used without providing sample values
- Template language doesn’t match the selected language setting
Tips & Best Practices
- Always add sample values before submitting — Meta requires them for templates that contain variables, and they speed up the review process.
- Keep body text concise — WhatsApp messages work best when they’re clear and to the point.
- Test with Sample values preview — Switch to Sample values in the preview panel to ensure the message reads well with real data substituted in.
- Use Reuse from approved — If you’re creating a similar template to one already approved, reuse it as a starting point to save time and reduce the chance of rejection.
- Match language carefully — If your message is in Hindi but you select English, it will be rejected.
- Match category carefully — If your message text is for Marketing category and selected category as Utility, it will be rejected.
- Save drafts often — Use Save Draft frequently so you don’t lose your work.