Adding a Document Template
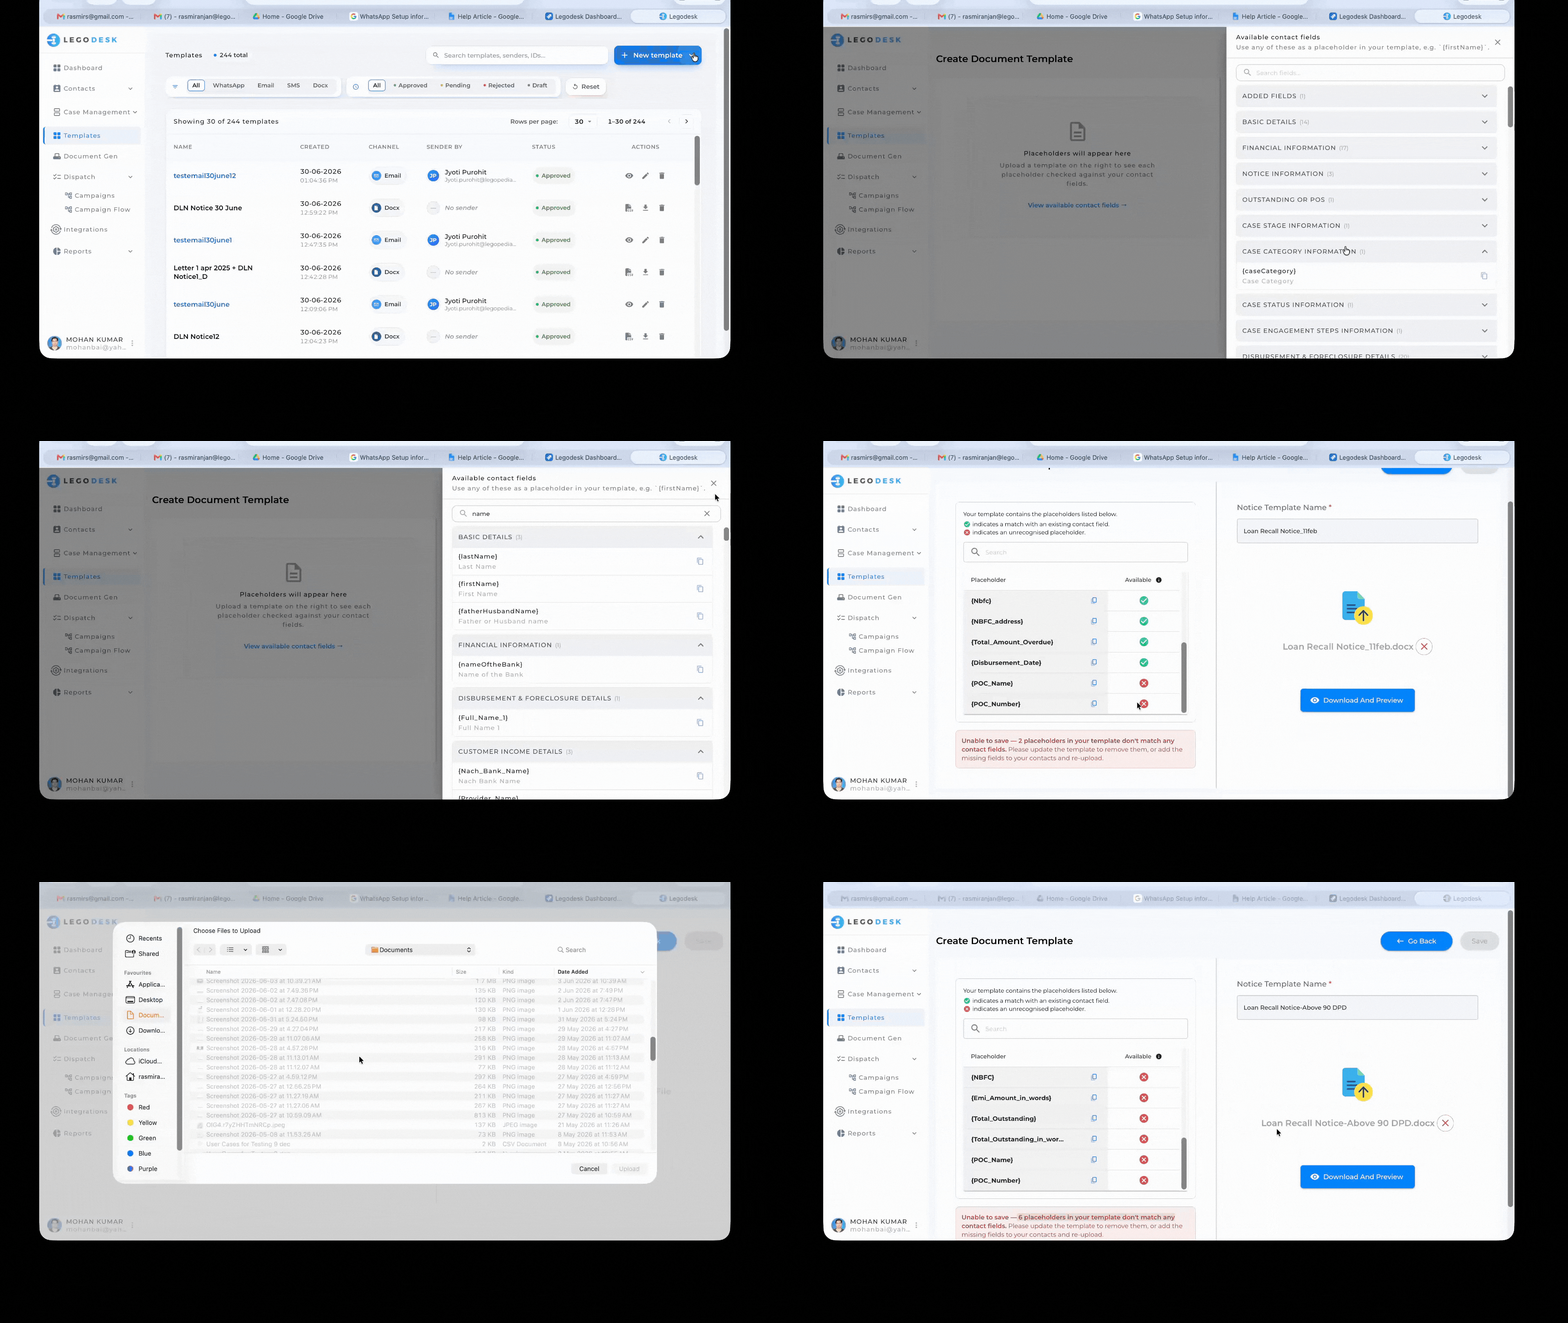
The Create Document Template page lets you upload a Word document (.doc or .docx) as a reusable template for notices, letters, and other client-facing documents. Legodesk automatically detects placeholders in your file and maps them to contact fields, so each generated document is personalised with the right data.
Where to Find It
Go to Templates in the left-hand navigation, then click Create Document Template (or the equivalent “Add” button on the Templates list page).
Step 1 – Upload Your Template File
On the right side of the page you will see a file upload area.
- Click “Drag and Drop or Click here to Select File” to browse for your file, or drag a file directly onto the upload area.
- Supported formats: .doc and .docx
- Once a file is selected, click Upload to process it.
After upload, the file name appears below the upload area with a remove (✕) button if you need to change it.
Step 2 – Review Detected Placeholders
After uploading, the left panel lists every placeholder found in your document.
| Column | Meaning |
|---|---|
| Placeholder | The variable name as written in your template, e.g. {Loan_Amount} |
| Available ✅ | Legodesk found a matching contact field — this placeholder will be filled automatically |
| Available ❌ | No matching contact field was found — this placeholder must be resolved before saving |
Use the Search box above the table to quickly find a specific placeholder.
Step 3 – Resolve Unrecognised Placeholders
Lorem ipsum dolor sit amet, consectetur adipiscing elit. Ut elit tellus, luctus nec ullamcorper mattis, pulvinar dapibus leo.
If any placeholders show a red ✕, you have two options:
Option A — Update the template document Remove or rename the unrecognised placeholder in your Word file to match an existing contact field name, then re-upload the file.
Option B — Add the missing field to your contacts If the field is genuinely needed, add it as a custom contact field in your account settings, then re-upload the template so Legodesk can match it.
Note: You cannot save the template until all placeholders are resolved. A warning banner at the bottom of the page will tell you how many unmatched placeholders remain.
Step 4 – View Available Contact Fields
Not sure which placeholder names to use? Click “View available contact fields →” (shown in the placeholder panel) to open the field reference panel on the right.
The panel groups fields into categories:
- Basic Details – name, address, phone, email, etc.
- Financial Information – loan amounts, interest, EMI, etc.
- Notice Information – notice dates and reference numbers
- Outstanding or POS – principal outstanding, overdue amounts
- Case Stage / Category / Status Information
- Case Engagement Steps Information
- Disbursement & Foreclosure Details
- …and more
Each field shows its placeholder syntax (e.g. {referenceId}). Click the copy icon next to any field to copy the placeholder to your clipboard, then paste it directly into your Word document.
Step 5 – Name and Save the Template
Enter a descriptive name in the Notice Template Name field on the right side of the page (marked with a red asterisk — it is required).
Once all placeholders are matched and the name is filled in, click Save (top-right corner) to store the template.
Previewing Before Saving
Click Download And Preview to download a copy of the uploaded file and verify it looks correct before committing.
Tips & Best Practices
- Use exact field names. Placeholder names are case-sensitive. Copy them from the Available Contact Fields panel to avoid typos.
- Keep formatting simple. Complex table structures or text boxes in Word may cause placeholder detection issues.
- One placeholder per variable. Do not split a placeholder across formatting runs in Word (e.g., avoid bold-formatting only part of {Loan_Amount}).
- Test with a sample contact. After saving, generate a document from the Templates list to confirm all fields populate correctly.