Creating an Email Template
This guide walks you through creating a new Email template, building its content with the drag-and-drop editor, and creating/attaching signatures so your templates go out with a consistent sign-off.
Step 1: Open the Templates page
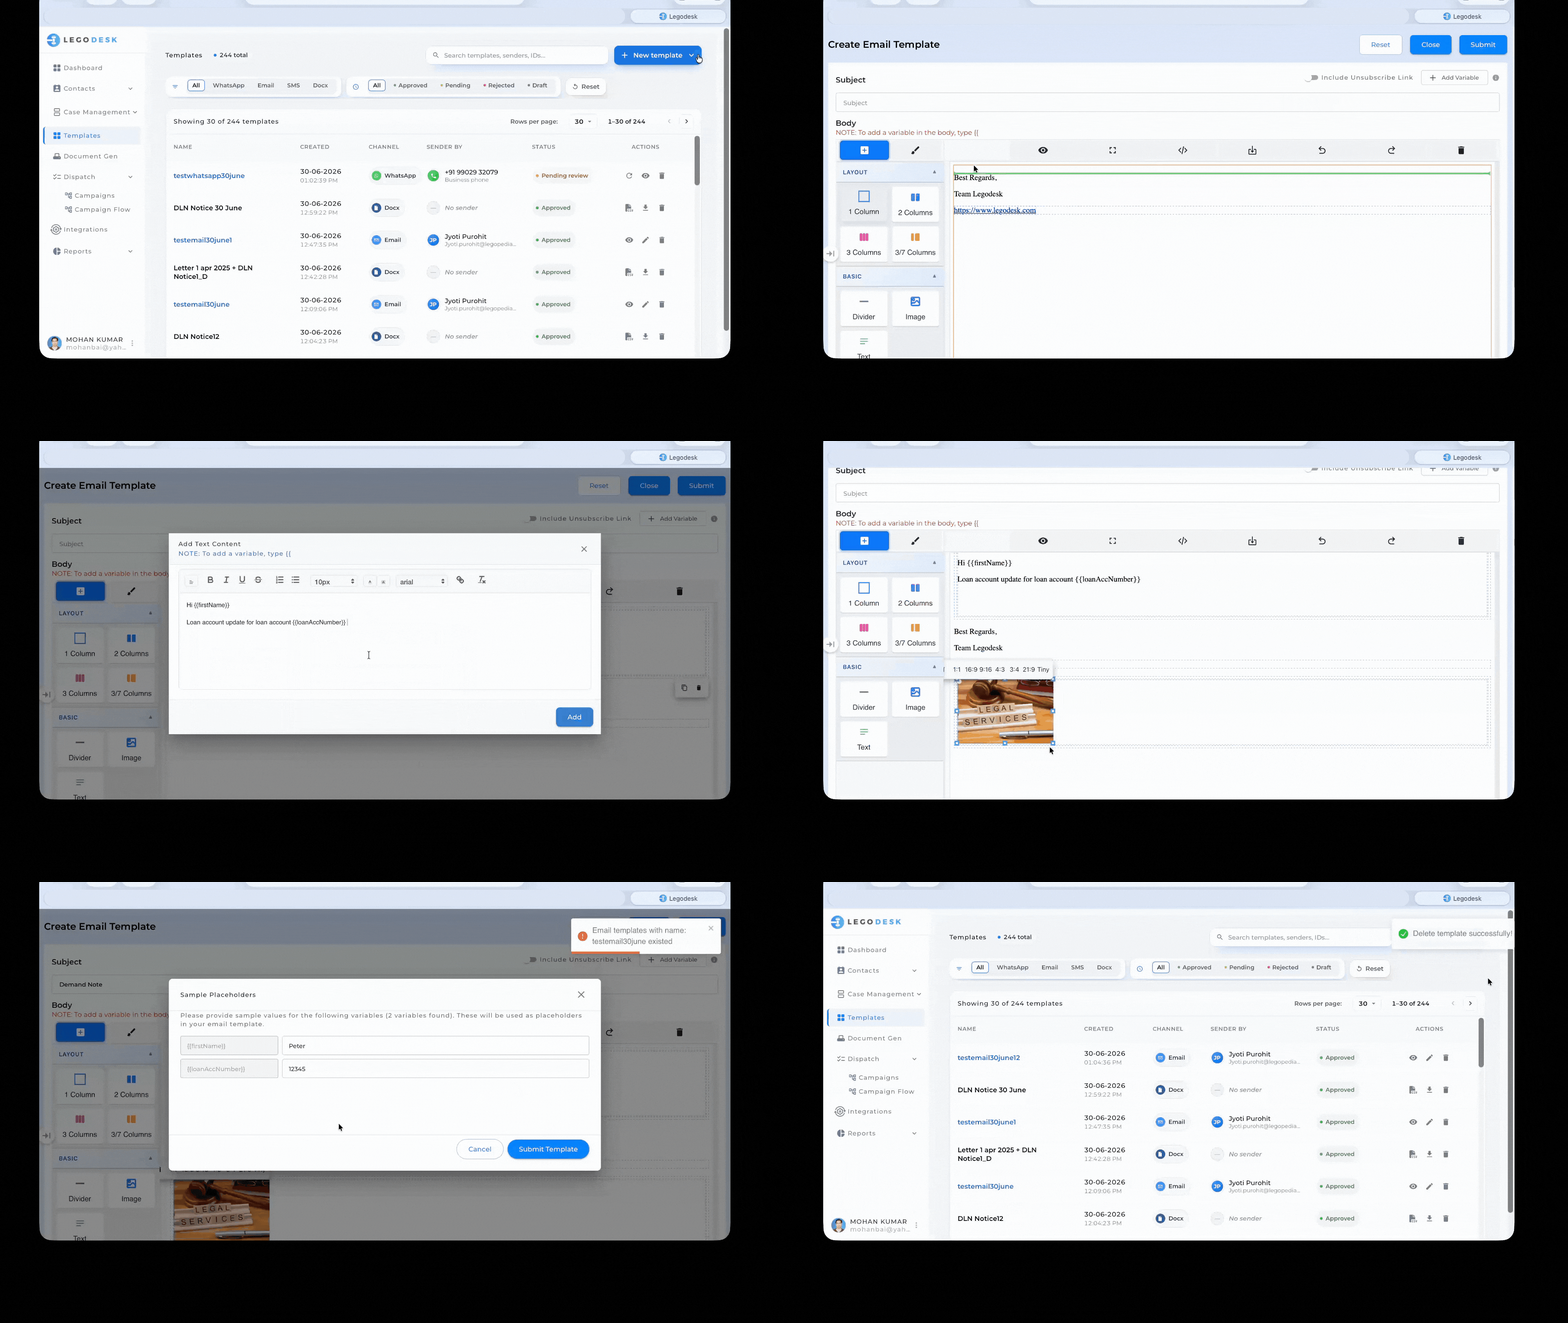
From the left sidebar, click Templates. This page shows all your existing templates (Email, WhatsApp, SMS, and Docx) along with their creation date, channel, sender, and approval status.
Step 2: Start a new template
Click + New template in the top-right corner. A panel titled Create a New Template appears with four options:
- WhatsApp – requires Meta approval
- Email – rich HTML with variables
- SMS – plain text with sender ID
- Docx – upload a Word document
Select Email to open the Create Email Template editor.
Step 3: Fill in the template details
In the Select panel on the left, fill in:
- Name – a clear, internal name for the template (e.g., “Demand Notice”).
- Select channel – choose any of the email sending channels (as set up in the Email service providers Dashboard) to use (e.g., LEGODESK_ZeptoMail).
- Sender Email – choose which verified sender address (as set up in the Email service providers Dashboard) the email will come from.
- Signature – choose an existing saved signature to append to the email, or use Add Signature to create one on the spot (see below for the full signature workflow).
Step 4: Write the Subject
In the main panel, enter the Subject line for the email (e.g., “Demand Notice”). You can also personalize the subject with variables — type {{ and select a field (e.g., {{firstName}}), or place your cursor in the Subject field and click Add Variable in the top-right to insert one, just as you would in the body.
Step 5: Build the email Body
The Body editor is a block-based builder. Use the + tab on the toolbar to open the content library, organized into sections:
- Layout – 1 Column, 2 Columns, 3 Columns, or 3/7 Columns, for structuring the email into sections.
- Basic – Divider, Image, and Text blocks.
Before using any Basic tool, you must first drag in a Layout block (e.g., 1 Column) to define the structure of that section of the email. Basic tools like Text, Image, and Divider are then placed inside a layout block — they can’t be added directly to the body on their own.
To add a text block:
- First add a Layout block (e.g., 1 Column) to the body if you haven’t already.
- Click Text (or drag a Text block into the layout block you just added).
- The Add Text Content dialog opens with a formatting toolbar (alignment, bold, italic, underline, strikethrough, lists, font size/color/family, link, clear formatting).
- Type your message. To insert a dynamic field, type {{ and select a variable — for example {{firstName}} or {{loanAccNumber}}. These are replaced with actual contact/case data when the email is sent.
- Click Add to insert the text into the body.
To add an image:
- Make sure a Layout block is already in place in the body.
- Click Image and upload or select your image.
- Use the aspect ratio handles (1:1, 16:9, 9:16, 4:3, 3:4, 21:9, Tiny) to resize/crop it to fit your layout.
Repeat with Layout and Basic tools until the email is fully composed — for example: a Layout block containing a greeting with variables and a body paragraph, another Layout block for the “Best Regards” closing, and a Layout block holding a supporting image.
Step 6: Use the toolbar controls
Above the body editor, you’ll find icons for:
- Preview (eye icon) – see how the email will render.
- Expand (fullscreen icon) – view the editor full-screen.
- Code view (</>) – view/edit the raw HTML.
- Download – export the template.
- Undo / Redo – step backward/forward through edits.
- Delete (trash icon) – remove a selected block.
You can also toggle Include Unsubscribe Link if this email should carry an unsubscribe footer, and use Add Variable to insert a contact field directly into the body or a selected block without typing {{.
Step 7: Submit
Once the Subject, Body, sender, and signature are set, click Submit in the top-right to save the template.
If you’ve used any variables (e.g., {{firstName}}, {{loanAccNumber}}) in the Subject or Body, the system will prompt you to enter sample text for each one before the template can be submitted. This sample data is used to generate a preview of how the email will look once real values are merged in — fill in a representative value for every variable listed, then confirm to proceed with submission.
The template will now appear in your Templates list with a status of Pending or Approved depending on your workflow. Use Reset to clear the form, or Close to exit without saving
Managing Signatures
Signatures are managed centrally so they can be reused across multiple Email templates.
Step 1: Navigate to the signature library
Go to Settings in the bottom left corner, then open Webhooks → Email. This page lists all saved signatures (e.g., “Signature,” “legodesk signature,” “Prachi,” etc.). Selecting a signature in the list shows a live preview on the right, including the sign-off text, name, company, and website link.
Each signature row has three actions:
- Checkmark – mark/select as active.
- Pencil (edit) – edit the signature content.
- Trash – delete the signature.
Step 2: Create a new signature
Click + Create New at the bottom of the list. The Create Signature dialog opens with:
- Name – an internal label for the signature (e.g., “New Signature”).
- A rich text editor with formatting controls (paragraph style, bold, italic, underline, link, ordered/unordered lists, clear formatting).
Add signature text (example, a name, company name, and website link, etc.) formatted the way you’d like it to appear at the bottom of every email.
Click Save to add it to your signature library, or Cancel to discard.
Step 3: Attach a signature to an Email template
Back in the Create Email Template editor, use the Signature dropdown in the left-hand Select panel to pick a saved signature by name. If you need a new one without leaving the template editor, click Add Signature to create it inline — it will be saved to the same library shown in Integrations → Webhooks → Email and become available for future templates too.